5 quick and healthy meal ideas for midterm season

Students don't have to eat junk food during crunch time

By: Bashair Ali

(Ella Olsson/Pexels)

It is one of the most stressful and busiest seasons for many Canadian post-secondary students — that's right, midterm week, the time of year when students spend their days cramming and their nights sleepless, trying to get everything done in one go. 

Let's face it, post-secondary students can have poor eating habits. Factors like engaging in irregular dietary routines, meal skipping and low intake of fruits, vegetables and dairy come into play when you're a university student. What people my age will be eating or even if they will eat during this hectic time is beyond me. But have no fear! I'm going to share five quick and delicious meals you need to try if you’re low on ideas.

I usually have no clue what I'm doing when it comes to cooking. But a girl has got to eat, so below are a few of the meals I make when my mom hasn't cooked and I've run out of Walmart's pre-packaged "healthy" dishes. These easy recipes are perfect for anyone concerned about their eating habits or perhaps wanting to enhance some of the meals they cook at home. You can prepare them in no time, making them ideal for midterm season. 

1. Healthy banana pancakes 

One serving of healthy banana pancakes. (Bashair Ali/CanCulture)

Our goal during midterm season is to ensure we feel energized and ready for whatever is thrown at us. Since breakfast is the most important meal of the day, what better way to begin the list off than with some nutritious and modified pancakes? This recipe from Tasty that I have been using for years only requires five ingredients and is very simple to make. It is the perfect recipe for people who love pancakes but prefer a healthier alternative. For four servings, you will need: 

  • 2 ripe bananas

  • 2 eggs

  • 5 ml (1 tsp) vanilla extract

  • 125 ml (1/2 cup) quick-cook oats

  • 5 ml (1 tsp) cinnamon

Instructions: 

  1. Make a smooth banana puree by mashing them in a large bowl. Beat eggs and vanilla until blended, then add oats and cinnamon. The oats will soak up some liquid if you let the batter sit for a few minutes, making it easier to hold together and flip.

  2. Add a scoop of the pancake batter to a skillet that has been coated with almond butter and heated to medium. Spread out evenly. The batter needs to be cooked for about 2 to 3 minutes until bubbles begin to form on top. You will need to flip the pancake and cook it for about 1 to 2 minutes until it is golden brown on each side. 

  3. You can top your pancakes with your favourite toppings (fruits, nuts, etc.) or drizzle a bit of honey on top instead of maple syrup!

2. A boiled egg, cottage cheese and cherry tomato sandwich with sriracha sauce

Your tastebuds will be satisfied with this delicious sandwich. (Bashair Ali/CanCulture)

Before you run away, hear me out. Initially, it might sound unusual as you read it aloud, but it isn't as bad as you think. You know when you complain to your parent(s) and say, "there's no food in the house!" Well, there is, and surprise, you're just too lazy to create a full meal. In fact, I created this contraption when my mother was out of town and I was so hungry that my stomach was about to eat itself. Here is what you need for one serving:

  • Your choice of bread (I used Rudolph bread)

  • 1 egg

  • 15 ml (1 tbsp) cottage cheese 

  • Sriracha sauce (how much you want is up to you)

  • 4 cherry tomatoes 

 Instructions

  1. Take a pot, fill it with water and add the egg. Place the temperature dial at 8 and set a timer for 10 minutes. Some people let the water boil first then lower the eggs into the pot, but it will just take longer for the eggs to finish boiling. I personally dislike waiting for my food, so my method is just the faster way. It’s your choice how you do it.

  2. Toast your bread. I like mine golden brown, so I toast it for 4 to 5 minutes. 

  3. You can slice your cherry tomatoes in half while you wait. 

  4. Afterwards, run the egg under cold water, crack it open and slice it however thick or thin you like.  

  5. As soon as your bread is ready, spread the cottage cheese evenly across with a butter knife. On top of the slices of bread, place your boiled egg, cherry tomatoes and sriracha sauce.

3. Veggie tuna bites

Homemade veggie tuna bites. (Bashair Ali/CanCulture)

It's important for me to incorporate protein into my diet but some days — more like most of the time — I don't have time to cook a chicken steak or legumes like beans and lentils. That's where this meal comes in. Tuna comes in cans, which makes my life a lot easier. Here is what you need: 

  • Canned tuna (I used 198g of Unico solid light tuna)

  • 125 ml (1/2 cup) of lettuce 

  • 60 ml (1/4 cup) of shredded carrots 

  • 30 ml (2 tbsp) of mayonnaise 

  • 80 ml (1/3 cup) of green, red, and/or yellow peppers  

  • A pinch of salt

  • A pinch of pepper

  • Crackers (I used Selection thin vegetable oven-baked crackers)

Instructions: 

  1. Open the can of tuna with a can opener, pour out the liquid content and set it aside. 

  2. After you have washed all your vegetables, chop up the lettuce and peppers into a bowl.

  3. Combine the shredded carrots, tuna and mayonnaise into the bowl of vegetables and mix.  

  4. While mixing, add a pinch of salt and pepper. When complete, place spoonfuls of the mix on the crackers. 

You can save some time by acting as if the tuna is a dip and picking it up with the crackers straight away. No double-dipping! The leftovers are plentiful when you use a whole tuna can.

4. Zucchini pizza bites

Start substituting dough with zucchini for your pizza bites. (Bashair Ali/CanCulture)

Rather than using refined carbs, these pizza bites replace them with nutrient-filled and fibre-rich zucchini. My take on this recipe by DamnDelicious only takes 15 minutes to make and tastes amazing. What you’ll need: 

  • 15 ml (1 tbsp) olive oil

  • 2 zucchini, cut into 6mm thick rounds

  • Kosher salt and freshly ground black pepper, to taste

  • 80 ml (1/3 cup) marinara sauce

  • 125 ml (1/2 cup) finely grated mozzarella

  • 15 ml (1 tbsp) Italian seasoning

Instructions: 

  1. Preheat the oven for broiling. 

  2. Cook over medium-high heat in a large skillet with olive oil. Using batches, cook the zucchini until golden brown, about 1 to 2 minutes per side, remember to flip as needed. Sprinkle with salt and pepper to taste.

  3. On a large baking sheet, arrange the zucchini rounds. Top each of them with marinara and mozzarella. You can add your favourite toppings, including mushrooms, pineapples and more (yes, pineapples belong on pizza). I chose to keep it simple and just add mozzarella cheese. Feel free to customize the meal to your liking.

  4. Then, bake for about 1 to 2 minutes until the cheese has melted.

  5. Serve immediately, sprinkled with Italian seasoning if desired.

5. Walnut salad

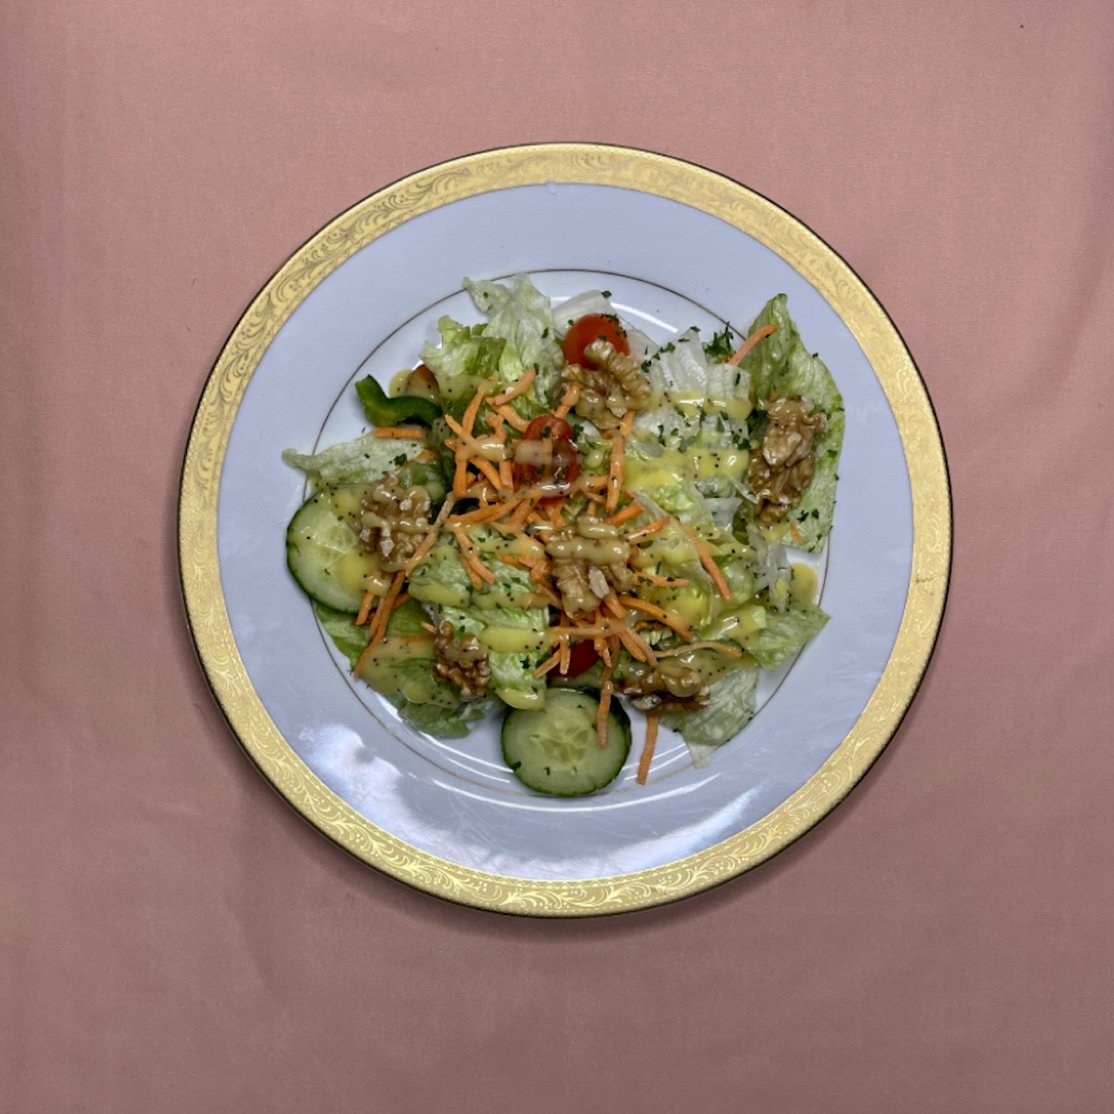
This salad is fast and easy to prepare. (Bashair Ali/CanCulture)

It's hard to go wrong with a good salad. I've been adding different types of nuts to my salads recently, such as almonds. But I decided to try something I don't normally use for this recipe and I have no regrets. Compared to saturated fats, walnuts contain polyunsaturated fatty acids, providing extra nutrition to the salad. It takes me no more than five minutes to make, so it’s perfect for midterms. You will need: 

  • 125 ml (1/2 cup) of lettuce 

  • Half a cucumber 

  • 10 cherry tomatoes 

  • 1 quarter of a green pepper

  • 60 ml (1/4 cup) of shredded carrots 

  • 5 ml (1 tsp) of dry cilantro 

  • A handful of walnuts 

  • Your choice of salad dressing (I used poppyseed)

Instructions: 

  1. Wash all your vegetables. 

  2. Chop the lettuce, cucumber, cherry tomatoes and green pepper. 

  3. Add your vegetables and shredded carrots to a plate. 

  4. Sprinkle on dry cilantro and walnuts. 

  5. Drizzle with salad dressing.

I hope you're inspired to make tasty meals during midterms by some of these recipes. 

More than eye candy: 5 Halloween decorations that double as food

Halloween food combinations to help you get in the spirit!

By: Aru Kaul

(Daisy Anderson/Pexels)

Get ready to throw the best party this Halloween with these spooky food combinations! You’ll give your guests a good scare and serve some delicious food at the same time.

1. Bloody Hot Dogs

To make this no-cook bloody treat, all you need is: 

  • Hot dogs

  • Hot dog buns

  • Ketchup 

  • A knife 

Instructions:

  1. Take the knife and cut off the top layer of the sausage on one end so that there is pink showing.

  2. Then, use the knife to make knuckle marks. 

  3. Put some ketchup in the hot dog bun and place the sausage on it. And there you have it! The perfect finger food (no pun intended).

2. Spider Pizzas

This is the perfect way for pizza lovers to get in the Halloween spirit! You seriously only need to prepare two items:

  • Mini pizzas

  • Black olives

Instructions:

  1. For the base of this creepy-crawly treat, it’s easier to buy ready-made mini pizzas, but you could definitely make your own too. 

  2. To make the spiders, cut some black olives in half, then cut the other half into thin slices. This will be the body and legs. 

  3. Assemble the olive slices in the shape of spiders on the pizza!

3. Monster Burger

This recipe is the perfect way to enjoy your burger of choice while also getting in the Halloween spirit!

Here’s what you’ll need:

  • Your patties of choice

  • Burger buns 

  • Cheese

  • Lettuce 

  • Green olives

  • A pair of scissors

  • Toothpicks

You can also include other ingredients if you like, but these are the main ones to make this scary sandwich! 

Instructions:

  1. The first step is to cook your patties until they’re ready and place them on the bottom burger bun, on top of the lettuce. 

  2. Then take your cheese out of its wrapper and start cutting. You’ll want to make a zigzag pattern on one end. Place it on the patty so that the zigzag hangs over the edge. 

  3. Once you’ve closed the burger with the top bun, finish by putting two toothpicks with green olives on the top — these are the monster’s eyes. 

4. Eyeball Pasta

This green, alien-like pasta is the perfect way to fill you up so you don’t eat too much candy! 

For this dish, prepare some: 

  • Pasta

  • Pesto sauce

  • Mozzarella balls

  • Black olives 

Instructions:

  1. The first step is to boil your pasta and toss it with your pesto sauce of choice. If you want to make the pasta even more green, you can add a few drops of green food colouring. 

  2. Slice some black olives and put them over the mozzarella balls — this is what you’ll top the pasta with. 

  3. Now you can enjoy. Just don’t look it in the eye!

5. Jalapeno Mummies

Now, jalapenos can be a little hard to swallow on their own for many (especially young kids), but I bet you nobody will even have their guards up when they’re looking this adorable. All you need for these mighty little guys is:

  • Jalapenos

  • Cream cheese

  • Croissant dough

  • Candy eyeballs 

Instructions:

  1. Cut each jalapeno in half and fill with cream cheese. 

  2. Cut some croissant dough into thin strips and wrap them over the jalapeno to resemble a mummy. Leave some space for the eyes. 

  3. Put them in the oven for 11 to 13 minutes and once they’ve cooled, stick on the candy eyeballs. Now you have something that will certainly spook out your guests with the spice!

5 candy recipes to try this Halloween

Because making desserts shouldn't be scarier than a horror movie

By: Ayleen Karamat

(Karolina Grabowska/Pexels)

Halloween is the best time of the year! With endless amounts of sweet treats, pumpkin patch visits and horror movies in the dark, there are so many things you can do to prepare for the spooky season. And while COVID-19 restrictions might have been relaxed across Canada this Halloween, some parents are still feeling uncertain about letting their unvaccinated or immunocompromised little ones go out trick-or-treating. But that’s no reason to miss out on all the fun, as you can learn how to create your own sweet treats for the season!

I’ll admit that I have absolutely no talent in the baking department. I mean, I'm shocked I haven’t set anything on fire yet. You would think that with my cooking abilities (self-proclaimed, obviously, but I can make a mean Thai red curry), I would have some talent for baking. No… not at all, but that doesn’t stop me from trying. This Halloween, I decided to challenge myself by making a few sweet treats and they all actually turned out pretty amazing! 

If you're worried about going out for Halloween because of COVID-19 and you want to experiment with making some sweet treats for trick-or-treaters, or perhaps with younger siblings or children who want to help you, here are some of the easy candy recipes I made. If I can make them taste decent then so can you!

1. Peanut butter fudge

An easy version of peanut butter fudge (Ayleen Karamat/CanCulture)

Growing up, fudge used to be — and still is — my favourite sweet snack. I never knew that one day I could also be making it in my kitchen. This recipe by Insanely Good is so easy to make and only requires three ingredients! Did I tell you that this is all made in the microwave in under five minutes? You couldn't ask for a simpler recipe than this! You will need:

  • 250 ml (1 cup) unsalted butter 

  • 250 ml (1 cup) peanut butter (the original recipe called for creamy peanut butter but I’m a fan of crunchy peanut butter)

  • 750 ml (3 cups) powdered sugar 

  • Water (if your dough becomes too grainy, add at your own discretion)

  • 20-cm (8-inch) square pan

  • Parchment paper

  • Microwave-safe bowl

  • Spatula

Instructions:

  1. Line your pan with parchment paper and leave enough paper to hang over the edge. This makes it easy to remove the fudge from the pan as you can lift it out!

  2. Combine the butter and peanut butter in a microwave-safe bowl.

  3. Place it in the microwave for one minute and stir. Do that again for another minute and mix until the mixture is completely smooth.

  4. Add in the sugar and stir. The batter should be paste-like and a little thick.

  5. Spread the batter in the lined pan. 

  6. Place another sheet of parchment paper on top of the fudge and press it down to make the top even.

  7. Place the pan in the fridge for up to two hours or even overnight. 

  8. After the mixture has cooled you can cut the fudge into small squares with a knife. Enjoy!

Before the expert fudge makers come and attack me, yes, this recipe isn’t like a normal fudge recipe. You don’t cook the mixture in a pot, but this process makes instant fudge without all the hassle of temperature, heat and time. You can even have young children help out in the process. There isn’t an open flame that you have to worry about and it significantly decreases the cooking time. If you don’t like peanut butter or have a peanut allergy, there are so many other flavours you could use instead. If you want to make chocolate fudge, this recipe also only has three ingredients and uses the microwave!

2. Dalgona (Korean sugar candy)

Squid Game-inspired dalgona candy (Alyeen Karamat/CanCulture)

With the rise of the Netflix show Squid Game, the candy featured in the show has become a worldwide sensation! According to ABC News, “a dalgona stall in Seoul says sales boosted up to eight times” because of the popularity of the show. The recipe only calls for two — yes, two — ingredients and can be made within five minutes. Unlike the show, a thriller about survival in life-threatening games, dalgona has a cute history. Street vendors in Korea sell dalgona, also known as ppopgi, which was a very popular snack in the '70s and '80s. Customers who buy the candy and can get the shape out of the centre without breaking it get another free dalgona from the vendor. Making this candy can be a fun activity for young children and fans of the show for Halloween. This recipe makes enough for one candy piece. You will need:

  • 30 ml (2 tbsp) of white granulated sugar 

  • A pinch of baking soda 

  • Ladle or small egg frying pan

  • Wooden stick (disposable is better)

  • Baking tray 

  • Butter or oil 

  • A plate (or another flat surface)

  • Cookie cutters (any shape will do but if you want to mimic the show, find cookie cutters with the shape of circles, triangles, stars and umbrellas)

  • Lollipop sticks — optional

Instructions:

  1. Coat the flat surface and pan with a little bit of butter or oil. This helps the sugar not stick and makes for easy removal.

  2. In the ladle or small pan, add the sugar. Place this over medium to low heat.

  3. When the sugar starts to melt around the edges, use your wooden stick to stir in the rest of the sugar. 

  4. Do this constantly, while making sure the sugar won’t burn on the heat. If there is smoke, take the mixture off the heat for a few seconds until it cools down. Repeat this as necessary until the mixture has no sugar clumps and is completely melted. 

  5. Remove the mixture from the heat and add a tiny bit of baking soda. This is where your mixture should expand and become foamy. Stir until the baking soda is completely dissolved and caramel in colour. 

  6. Pour the mixture onto the pan. This is where you can add the lollipop stick.

  7. Let this mixture cool for 30 seconds. Take the lightly oiled plate and press the slightly cooled mixture for five seconds into a thin disc.

  8. Immediately stamp it with a cookie cutter and let it set. Remove from the pan and use a toothpick or needle to get the shape out. Enjoy!

  9. For clean up, if you have hard sugar stuck to your materials, boil a pot of water and when it is boiling, plop your materials inside! Take them out after a few minutes and your materials should be as good as new.

You can also find countless videos on YouTube and TikTok about this viral candy that everyone seems to be making. For only two ingredients, this recipe takes a few good tries before you get the perfect candy, but once you get it right you won’t be able to stop making them!

3. Peanut butter cups

Homemade chocolate peanut butter cups (Ayleen Karamat/CanCulture)

Peanut butter cups are my vice, but homemade is really the way to go. If you are obsessed with Reese’s Peanut Butter Cups like I am, challenge yourself to see if you can make them from scratch! Here is what you need for the recipe:

  • A package of milk chocolate chips 

  • 250 ml (1 cup) of peanut butter

  • Cupcake pan

  • Muffin liners 

  • Microwave-safe bowl

Instructions:

  1. Place your muffin liners in a cupcake pan.

  2. Place half of the chocolate chips in a microwave-safe bowl, and melt in the microwave for two minutes.

  3. Once melted, fill the muffin cups halfway with the melted chocolate. Use a spoon to help you coat the sides of the muffin cups. Refrigerate for 20 minutes before the next step.

  4. Spoon the peanut butter into the chocolate cups, filling them about three-quarters of the way.

  5. Melt the remaining chocolate chips in the microwave and spoon them over the filling.

  6. Refrigerate for 10 to 20 minutes. Enjoy!

Instead of using milk chocolate, you can mix it up and use dark chocolate. The warm and dark taste of chocolate complements the nutty and salty flavour of peanut butter. I also tried making a strawberry jam filling and a Nutella filling by taking both fillings and adding them about three-quarters of the way into the cups, and then covering them with melted chocolate to lock it into place. This makes for great a peanut-free recipe! Here is a great resource for other fillings you can use in your cups.

4. Peanut brittle

This peanut brittle can be made in the microwave (Ayleen Karamat/CanCulture)

This recipe is something I’ve grown up with and had at every family get-together, so making it was very nostalgic. The best part of this recipe is that you can cook it all in your microwave. Here is what you need:

  • 250 ml (1 cup) white sugar

  • 125 ml (1/2 cup) light corn syrup

  • 250 ml (1 cup) peanuts (use whatever kind of nuts you want! I used 125 ml of peanuts and 125 ml of walnuts)

  • 5 ml (1 tsp) vanilla extract 

  • 5 ml (1 tsp) butter

  • 5 ml (1 tsp) baking soda

  • Butter, cooking spray or parchment paper to coat the bowl and pan

  • Microwave-safe bowl

  • Baking pan

  • Spatula

Instructions:

  1. Add butter or cooking spray to the bowl, baking pan and spatula. When the sugar hardens it will be very hard to get out so this helps you prepare beforehand! If sugar does harden on your materials, you can always put them in a bowl of boiling water.

  2. Combine the sugar and corn syrup in a bowl. Microwave for four minutes at one-minute intervals. Be very careful, the bowl is very hot!

  3. Add in the peanuts and use your spatula to stir in the sugar mixture. 

  4. Place the bowl back into the microwave and cook it for 3.5 minutes (again, at one-minute intervals so you don’t burn anything)

  5. Take the bowl out and add the vanilla extract and butter.

  6. Microwave the mixture one last time for one minute.

  7. Remove the bowl from the microwave and add the baking soda. Keep mixing until the peanut brittle becomes orange and foamy.

  8. Take the candy out of the bowl and spread it evenly on the buttered baking pan. Try to be quick and careful because the mixture is very hot. If you take your time it will almost immediately set.

  9. Let the peanut brittle set at room temperature until it is cool to the touch.

  10. Break it into small pieces and you’re done!

This sweet and salty recipe is perfect for dinners, snacking or even gifting. I served this at my mom’s birthday and my family approved — so you know it tastes amazing!

5. Candy cookie bars

This cookie bar is a delicious use for your leftover Halloween candy (Ayleen Karamat/CanCulture)

I think out of all the recipes I tried, this one had to be my favourite. I liked the freedom I had with the chocolates I could use, and I’m also a sucker for cookie dough! Any kind of candy will do, from peanut-free options to your leftover Halloween candy. Who doesn’t love a cookie bar filled with all of your favourite sweets! Here’s what you’ll need:

  • 250 ml (1 cup) white sugar

  • 250 ml (1 cup) brown sugar 

  • 250 ml (1 cup) melted butter

  • 2 eggs 

  • 10 ml (2 tsp) vanilla extract

  • 2 ml (1/2 tsp) salt 

  • 2 ml (1/2 tsp) baking powder 

  • 500 ml (2 cups) flour 

  • 375 ml (1.5 cups) assorted candy of your choice

  • Large bowl

  • Spatula

Instructions:

  1. Preheat the oven to 175 C (350 F).

  2. Chop your candy of choice into bite-size pieces.

  3. Mix the two sugars and melted butter in a large bowl. Whisk until the mixture turns lighter in colour.

  4. Add in the eggs, vanilla, salt, flour and baking powder until the mixture is completely blended and smooth.

  5. Add in your candy. Make sure that everything is evenly mixed.

  6. Pour your mixture into a lightly greased pan. Smooth and place it in the oven.

  7. Bake for 45 to 50 minutes.

This recipe allows a lot of freedom for whatever choice of candy you would like. You can even add in leftover candy from Halloween. To make the cookie bars look more colourful, add different types of chocolates. You can even add small candies like M&Ms or candy eyeballs to give them that pop of colour.

I hope some of these recipes inspire you to make something delicious for Halloween, whether it’s for yourself, your kids or for family get-togethers.